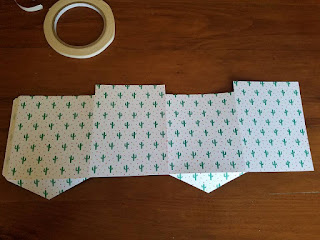
First I traced around the pretty pocket template in pencil on some Festive Birthday designer paper.
Then I used my Stampin' Trimmer to cut it out, because I can't cut a straight line with scissors! (Note: see that downward point at the bottom left? Make sure there's a little angle for the flap on the left side and don't cut it all the way across!)
I also did my scoring with this tool to make it easier - my favorite feature of the trimmer!
I cut two of these from the template and put tear-n-tape on the flaps. I saw this awesome tip for holding the tape! Put your hand inside the hole and have the tape feeding off from the top of the roll - small detail but it makes for easy placement!
Then I attached the two together. There is an advantage to making your own - you can apply tear n tape to the right side on the points!
Close it up with tear n tape in the same way.
Apply tear n tape to the flaps, but only remove one side at a time. It was easier for me to attach one at a time without worrying about the other side sticking to everything!
Peel the backing off of the tear n tape you applied to the points and stick down to the cardstock bottom.

Two ends of paper stick up a little higher along the top rim, which I like to have so I can fold them down and give it a finished edge look. Of course, I'll embellish it up!
Want to CASE this box? It's fun and easy, and it accommodates our usual Medium size greeting cards! Great for cute storage or a gift!
Happy creating!
Your demonstrator,
Rachel


No comments:
Post a Comment